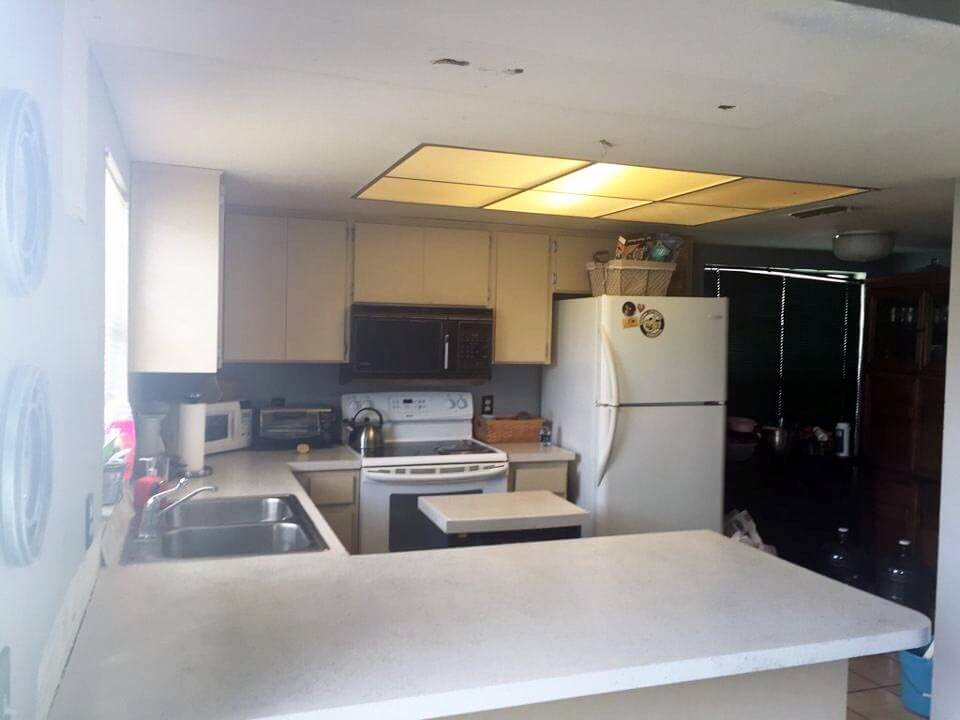
I’m still making over my vanilla kitchen and the big elephant(s) in the room are my kitchen cabinets. ‘What in the world are you going to do with those cabinets?’ you’ve been saying. Now I’m about to tell you just how to DIY shaker style cabinets from listless flat doors, even if they’re 80s plastic/laminate AND damaged.
Ok, again, here’s what we’re working with:
The Hunt for Affordable Cabinet Doors
The research began and I found a few options that were viable.
This post contains affiliate links. If you click on a link and make a purchase I earn a small commission to help me run this site at no cost to you. Read my full disclosure here.
New Cabinets
What I really wanted to do was gut and just buy new ones. But er umm…remember my budget for this entire project was $2,000, so, unfortunately, that was a no-go. New cabinets immediately got taken off the list. Even if I went with inexpensive Ikea ones, that plus delivery would eat the entire budget.
Refacing/Refinishing Kitchen Cabinets
Next, I looked at refacing. Like an idiot, I assumed refacing would cost less than getting new cabinets at Ikea. Let’s just say I find that option a complete rip-off. It cost wayyyyy more–like you-need-to-finance more. So that was a no-go as well.
Buying New Shaker Style Doors
Then I looked at just buying new cabinet doors and hinges. I found a few sites that made custom doors for a decent price. About $15 each plus the cost of hardware. That worked out to be $225. Not bad at all. EXCEPT shipping killed the deal. The closest place I could find for shipping was in Atlanta and the shipping cost was astronomical. UGH!
How to build Shaker Style Kitchen Cabinet Doors on a Budget
I finally had to move on to my final budget-friendly option: use my existing kitchen cabinet doors, add shaker trim and paint them blue. Just saying all that made me bone-tired because I knew it would be a ton of work. I wasn’t wrong, BUT I was convinced I could do it and it would make a world of a difference in my kitchen. Right again. It totally transformed things.
Again, I researched every little detail. I like to go in eyes wide open so I know exactly what I’m getting myself into.
After reading many many blog posts, articles and how-to on building shaker style doors, I had to start with supplies. Umm…I had never worked with power tools in my life unless you count a drill. But I knew I could do it.
Supply list for how to build shaker style kitchen cabinet doors on a budget
Experience Level | Beginner (just a learning curve with the saw, but it’s very easy) | Cost | You’ll spend about $200 for all supplies and tools. I had to buy everything except the sander. However, I saw the tools as an investment for future projects. I also used coupons, cashback apps like Swagbucks and Rakuten. etc to bring my actual total spent down to about $150. Time Investment | LOTS. I wish I could tell you exactly, but I did a little here and a little there.
- ½ inch MDF cut into 2-inch strips for doors and cut into 1.5-inch strips for tops and bottoms of drawers. I found this with the small sheets of pre-cut wood of Home Depot. I only had to buy one sheet for about $8 you will need more.
- Loctite Glue
- Wood Filler
- Circular saw or table saw (This is the one I bought)
- Rip Guide (make sure you get one to fit your saw)
- Fine tooth saw blade (I purchased one instore at Harbor Freight)
- Sawhorse or workbench
- Clamps
- Safety goggles (I purchased from Dollar Tree)
- Ear protection (Dollar Tree)
- Nail gun (Optional but recommended)
- Compressor (Optional but recommended)
- Electric sander
- Sandpaper in several grits from 80 to 400
Ripping down the Wood for the Kitchen Cabinet Doors
Every article I read was very vague on getting the wood cut. They all said to get it ripped at the hardware store. But most of the stores around me don’t rip down lumber. They’ll cut, but not rip. (Ripping simply means taking a large piece of wood and cut into thin strips.)
Lucky me, I had a contractor friend who was using this very same process to do cabinets in a high-end home. He gave me a bunch of pre-cut quarter-inch thick, two-inch-wide MDF strips. Total score. All I had to do was cut them to size. Unfortunately, I ran out of what he gave and had to head to the hardware store myself.
I bought one sheet of the MDF paneling and ripped it down myself and the process wasn’t too bad.

You want to keep everything nice and straight. I did not want to invest in a table saw, so I bought this circular saw and fine-tooth blade, workbench and rip guide. I didn’t even tell my husband I bought the saw because I was afraid he would protest. When I needed to change the blade on the one that came loaded on the saw, I had a little trouble and snuck it over to my brother-in-law. He changed it for me and I snuck it back inside. I was determined! Luckily when my husband came home early one day and caught me sawing, he just whipped out his phone and started recording. I was a sight with sawdust in my hair, goggles, and earmuffs.
To rip down the MDF, I lined it up on my workbench. Clamped it in place and used a rip guide to get a straight cut. The guide allows you to set a measurement and cut a straight line multiple times without having to stop and remark and measure every time. This cheap rip guide worked out, but if you’re going to be doing a lot more cutting in the future you may want to invest in something more substantial like this one.
I ripped the board down to two-inches for the cabinets. The drawers needed two-inch strips on the sides, but one-inch strips on the top and bottom.
Adding the Strips to the door to form the Shaker Paneling

Once I got all the strips cut, I measured the doors and made sure the strips I cut fit each door. Then it was time to affix them to the doors. I tried to keep my kitchen intact as much as I could because I did this over a period of two weeks. A little here, a little there. I didn’t take the doors off unless it was completely necessary (mainly if I had to sand excessively and when I got to the painting phase).
To prep the doors, I gave them a good cleaning using this TSP Substitute. I wanted to take care of this while they were still flat. After that, I lined up the strips on the door and used this Ah-may-zing glue on the back of the strips. My contractor friend hipped me to this stuff. He’s used it to fuse marble together! If you buy enough clamps and have enough patience, this glue would actually allow you to skip nailing the strips in place. It’s that good.
Me, on the other hand, did not have enough clamps or patience so I bought a compressor and nailer. I will say as a newbie it took me forever to determine out how to attach the gun to the hose, but I finally figured out.
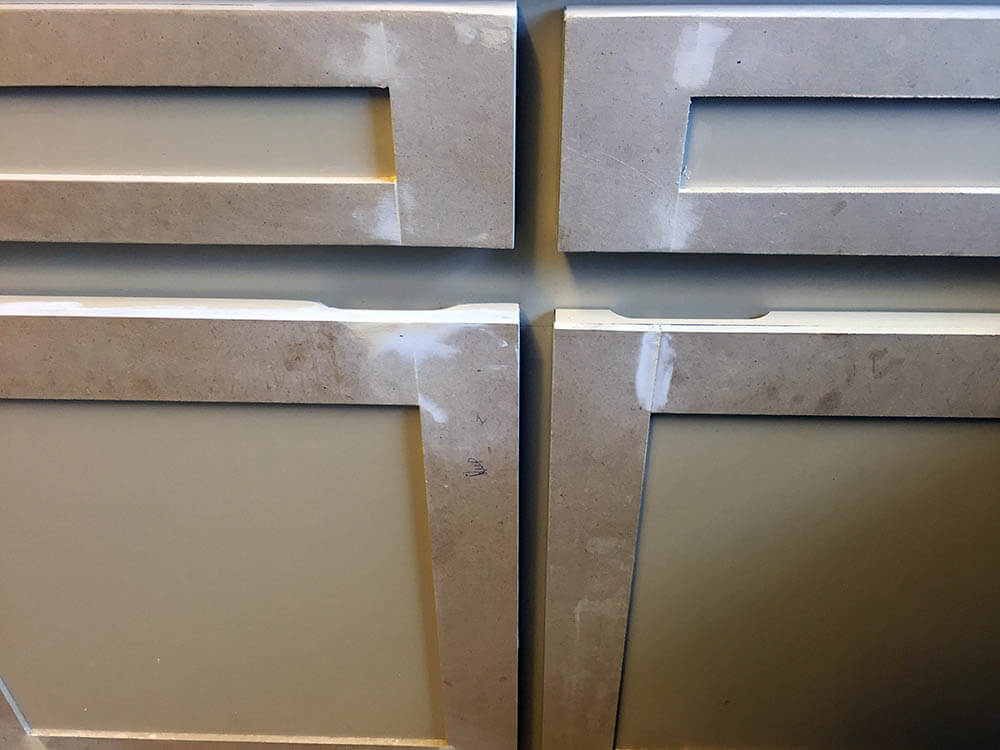
I nailed and glued the strips on. I know you can buy cabinets with seams in the shaker style, but I figured why when I can make it seamless. The key to making it seamless is cutting your wood so it fits really tightly together to create your shaker rectangle. (And if you’re like me who makes mistakes) getting some REALLY good wood filler and doing a few layers. Bahaha! When I tell you this wood filler saved me, it SAVED ME.
My seams are nice and tight covered and not noticeable at all once sanded properly. (I’ve later learned to get better seam, cut your wood on the waste side of your marked line rather than directly on the line.)
Now the sanding process was a PROCESS. Get the front of the doors and drawers all laid out. Start with a medium grit paper (120), sanded everything then switched switch sanding paper and repeat. I went all the way up to 400 grit paper, skipping grits in between Another tip from my contractor friend. It took about 2 hours to do all the doors and drawers.
Fixing the little things
My hardware-less doors also needed a little attention. They had a scoop for handles that I didn’t want showing after they were painted, I used this same amazing filler to literally fill in the gap and bring it flush to the top of the cabinets. I did a few thick layers allowing it to dry in between coats.
I was not perfect at nailing everything flush so I had a quite a bit of sanding to do on a few of the doors. That’s the beauty of using MDF it sands down BEAUTIFULLY. For areas that needed heavy sanding, I started with 80 grit sandpaper. Pretty much grinding the MDF down.
Here’s how she’s shaping up. She’s still vanilla, but now she’s got a little character.
I had to buy new hinges to replace my oil rubbed bronze old dirty ones. More to come on the paint job. Making shaker-style doors from your existing doors isn’t a difficult process, but it will take you some time and sweat equity. But the payoff is HUGE!
Update: The kitchen is DONE! See Links Below
Kitchen Makeover Series
Below are all the links to the Kitchen Series. As you can see, I did a ton of work, but it was all worth the effort.
Before After
- Kitchen Makeover Plans
- DIY Laminate Countertop Makeover on a Budget
- How to Make DIY Shaker Cabinet Doors on a Budget
- The Best Paint for Laminate Kitchen Cabinets
- What you need to know about Installing Glass Peel and Stick Tile
- How to Paint a Vent Hood
- How to Get the Best Deal on Name Brand Appliances
- Why Luxury Vinyl Tile is Best for Your Kitchen
- Replace Fluorescent Light Box in Your Kitchen
- Ceiling Painting Tips for your Kitchen (Hint use pink paint!)
- Kitchen Makeover Story-The Final Reval
Tara Adams says
It looks great! The saw story is hilarious lol
Kenyatta Harris says
It was too late to pack up everything when he was driving up. I said oh well, no turning back now!
Kristen says
Wow, Kenyatta, this looks so amazing!!! You are doing a great job!
Kenyatta Harris says
Thanks Kristen, the work is certainly paying off!
Rhonesha says
This looks great so far! Can’t wait for the finished results.
Kenyatta Harris says
Thank you!. I’m excited to be seeing the light at the end of the tunnel.
Ola says
I am SO proud of you Kenyatta! Great job. I can’t wait to see the finished look!
Tia says
Loving how it is looking thus far. Can’t wait to see the final look.
Stephanie Abbott says
Great job, Kenyatta! Such a huge project for a new tool user. You’re a champ. Can’t wait to see the rest!
Debbie says
Looks great! I can’t wait to see it all finished Nice job! ?
Kenyatta Harris says
Thank you Debbie. It’s amazing what you can do armed with a little knowledge.