There is hope for your fluorescent light fixture and light box—I’m living proof you can rid yourself of it and it’s not as painful as you think.
After waiting what seems like an eternity, I finally gave my kitchen’s ugly 1980’s fluorescent light a makeover. Why fluorescent light boxes were ever a thing I’ll never know. But I was so happy to say goodbye to that eyesore and hello to this upgrade.
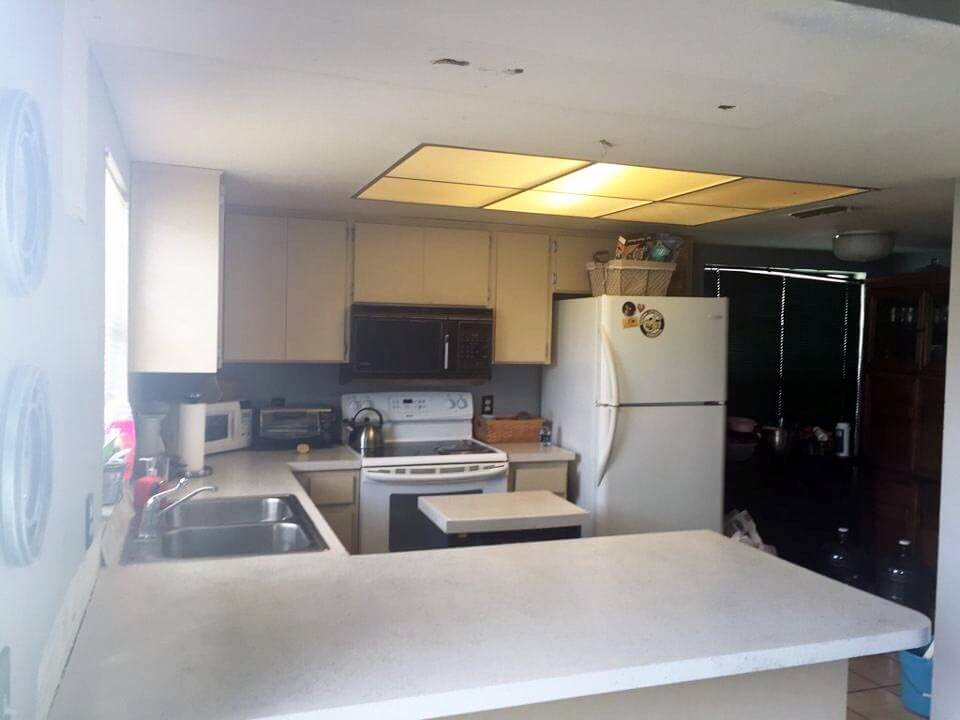
Here’s my kitchen before I started the kitchen makeover. It’s the best photo of
How to remove a T-bar system for Flourescent Lights
To prep for the kitchen light box upgrade, I removed the metal t-bar system using a combination of my drill, a flat head screwdriver, and a hammer. The screws took a hex bit, If your drill doesn’t have a matching bit, these are fairly inexpensive.
Some bars were screwed into each other and then the perimeter had been nailed into the wall. This took all of 10 minutes.
This post contains affiliate links for your convenience. If you click on a link and make a purchase I earn a small commission to help me run this site at no cost to you. Read my full disclosure here.
If you’re intimidated by that metal contraption, don’t be. The bars are extremely light. You may need an extra set of hands to keep it from

That left me with a little drywall patchwork to do to ensure the end product looked more like a tray ceiling than a souped-up fluorescent light box. To patch the holes and fix the sides I used an all-purpose spackle. (once the fluorescent lights were down, I had several holes I needed to patch. )
RELATED: How to Patch Holes in Your Walls.
Adding Trim to Replace your Kitchen Fluorescent Light Box
I moved on to trimming out the outer perimeter to give it a little architectural interest. I purchased a 4’x8’x.25” thick cheap wood board at the blue hardware store. I had them cut it down into 5-inch strips and I used this miter saw (which I love) to cut it to size. In hindsight, I should have had them cut it to 4-inch strips because my miter saw only cuts up to about 4.25″ easily. That little misstep required me to cut it from both sides in order to get it all the way across. NOT the best idea when you’re trying to get tight mitered seams.

I gave the edges a quick sanding and used my nail gun and compressor combo to adhere the trim to the ceiling. Patch up with the nail holes wood filler. You should also use an adhesive like Liquid Nails. The nails are supposed to keep the trim in place. Until the glue dries. But honestly, those nails aren’t going anywhere.
Alternatives to Fluorescent light in the kitchen
Now to add some pretty.
Admittedly there are VERY FEW pretty ideas out there to replace fluorescent light fixtures. I mean I hunted high and low. My desire was to fill it with a rectangle shape to fill the space. I originally chose this beauty.

I even had that bad boy delivered only to realize that I broke a cardinal rule of not paying attention to my measurements. I took the measurement of the space and compared it to every light I was considering EXCEPT the one I actually bought.
Palm to Face.
That design mistake cost me $80 in return shipping.
I needed roughly 3000 lumens to replace the old fluorescent lights. You’ll need to determine your light output for your square footage. I’m also debating on installing a few recessed lights inside the lightbox.
Essentially you can replace the fluorescent light with any fixture as long as you make sure it will provide the light you need.
My lightbox measured 4’x6’x12” around. Unfortunately, my ceiling drops from 10
That meant I only had about 15 inches to play with for the height. I wanted something that took up a lot of space and
I did find this girl, who resembles the one I had to return.
She can be installed anywhere and came with four 10” rods to be hung high or low. That is perfect for a shallow light box makeover. She’s even more beautiful in brass, but we plan to move in the next year or so and I didn’t want to get too trendy.
And umm, because I had to patch my ceiling holes while she was in place, I broke the light and had to get a replacement. Don’t even ask.
See what had happened was….
I waited on an electrician to actually deal with the major electrical stuff. I am not that girl to mess with what seemed to be complicated wires. I had three fluorescent bars connected together. And of course, the junction box did not fall in the center of the light box. My electrician (a friend) removed the lights and centered the location of the junction box. It wasn’t a big deal, we just had to buy a simple braced junction box that he positioned in between the studs in the attic.
Once that part was done, I could have actually taken over. I can wire a basic light, but he did it all for me.
Anyway when I texted him to see when he could come, he said 20 minutes when I was thinking ‘next week’. And when an electrician says he’s down the street, you just say ok. So even though I wanted to paint the ceiling and patch the holes first, I had him install it.
Thank goodness the Amazon seller replaced the light for me at no cost.
Soooo because I had two lights to play with, I decided I’ll install the second one in the dining room (the broken piece can be used on another ceiling) until I figure out what I want in there. It will replace this brass light fixture I gave a $0 makeover a while back.
And after 16 years of living with an ugly fluorescent light
For the
Anyway, my vanilla kitchen has come a long way from the milkshake it used to be. The kitchen box light makeover was the last of the 80s to be banished and now I can focus on something else.
Kitchen Makeover Series
Below are all the links to the Kitchen Series. As you can see, I did a ton of work, but it was all worth the effort.
Before After
- Kitchen Makeover Plans
- DIY Laminate Countertop Makeover on a Budget
- How to Make DIY Shaker Cabinet Doors on a Budget
- The Best Paint for Laminate Kitchen Cabinets
- What you need to know about Installing Glass Peel and Stick Tile
- How to Paint a Vent Hood
- How to Get the Best Deal on Name Brand Appliances
- Why Luxury Vinyl Tile is Best for Your Kitchen
- Replace Fluorescent Light Box in Your Kitchen
- Ceiling Painting Tips for your Kitchen (Hint use pink paint!)
- Kitchen Makeover Story-The Final Reval
Tia Rich says
Love it!!
Kandace says
Wow! So much prettier! I love the whole kitchen!
Kenyatta Harris says
Thanks Kandace. It’s soo much better now.
Lori says
Hello!
Beautiful job. I had the same thing done to my kitchen ceiling, and the depth of my box looks just like yours. I used A 4 light track lighting and I don’t like it. It isn’t bright enough and cast too many shadows. I’m really in a fix on what to do for bright lighting. Your choice of a ceiling fixture was beautiful, does it give off enough light? I’d love to know. As I said my kitchen is pretty much just like yours, and some of the lighting calls for four 60 bulbs watts. Not enough light. So frustrating! Hope you can help me!!!
Lori
Kenyatta Harris says
Hi Lori, thank you for the compliements. I agonized over a light for that very reason. The one I chose gives a decent amount of light. BUT it less light than the fluorescents that were there. Just for looks I may add 4-5 recessed lights and 2 pendant lights later on.
Marcus says
Am I missing something? Where is the final photo of new light fixture, painted trim, and finished look?
Kenyatta Harris says
Hi Marcus. I did a separate post on tips for painting this ceiling. you can see it here. https://mydesignrules.com/pink-ceiling-paint-tips/
I didn’t realize it wasn’t linked in the article my apologies.
Marcus says
Looks great! Thank you!
Christine says
Curious but what is the length, width & height of your drop down ceiling ? I am getting started on mine , & have 3 fluorescent lights about 8 “ apart & are placed horizontally 48” the width of my drop down ceiling. I have a galley kitchen . Your kitchen looks exactly like mine as far as placement of your refrigerator ,stove counters, cabinets & the drop down ceiling location. I love your light fixture, I was thinking I would either install 3 pendant lights to replace the fluorescents , or buy a semi flush mount similar to your style & put in 2 recessed lights on either side of my light fixture.
Kenyatta says
Hi Christine, I don’t have the measurements and we have since moved. I would guess it was about 6-7 feet long by 4-5 feet wide. I definitely think the recessed lights are a great idea. Good luck on your project!
PS. Sorry for the delayed response. I usually get comments via email and this one didn’t come through.