Besides being adorable, baby mobiles actually serve a function in a nursery. Babies love to ooh and ahh over the colors and shapes and mama gets a little break. Buying a hanging nursery mobile is great, but when you can make your own, it’s always extra special.
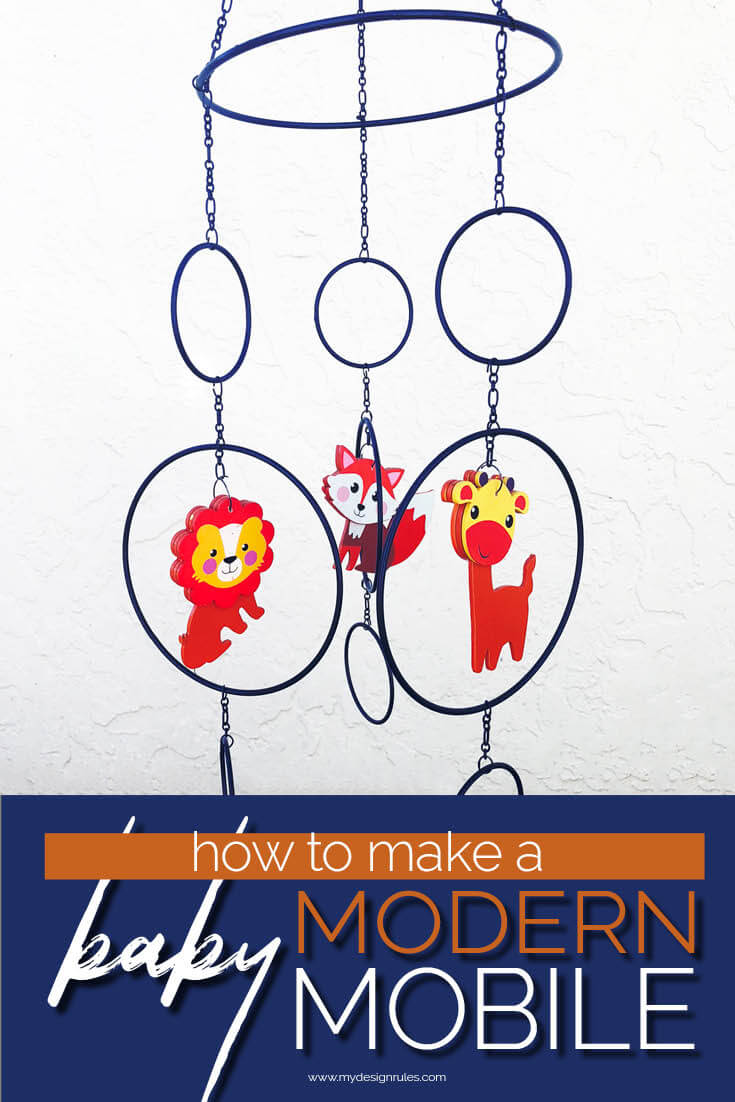
I sat down to figure out how to make a mobile and it was just as easy as it looks. I hung this blue and orange modern circle from the ceiling instead of a crib arm and love the result.
It’s chic-cute. Is that a thing? I can make stuff up right?!
Now I say it was easy, that doesn’t mean it wasn’t without any drama on my part. I didn’t think through all the steps and got a little ahead of myself…but the results are still fab. My photos will tell on me. But YOU, Missy, do as I say, not as I did!
How to make a mobile for your nursery
This post contains affiliate links for your convenience. If you click on a link and make a purchase I earn a small commission to help me run this site at no cost to you. Read my full disclosure here.
DIY hanging baby mobile supplies
This baby mobile tutorial includes simple materials as you can get from Walmart and any craft store for a good price.

- Craft rings in several sizes:
- 1 7-inch
- 3 5-inch or 6-inch
- 6 3-inch
- Jewelry chain (70 inches)
- Medium Jump rings and 3 Large jump rings
- Wire Cutters
- Pliers
- Drill
- Ceiling hook
- Baby wooden animals (optional) these are similar, I found mine at Walmart in the craft section. They carry about 10 different animals.
- Spatula (optional)
- Spray paint (optional)
Difficulty: Easy | Cost: $20 | Time: about an hour working time, but if you spray paint, allow it to dry overnight before handling.
Instructions for your DIY hanging mobile frame
Step 1- Determine your mobile pattern:

I chose a simple pattern of small-large-small for my rings. You could make it random, use all the same size, or even use a mixture of squares, circles, and triangles.
Step 2 – Measure out your chain length.

I wanted the mobile to be symmetrical, so for each of the three arms I was making, I made sure to measure exactly the same amount of chain. Using the chain allows you to be precise without having to bust out a ruler. I simply counted the links and cut with my wire cutters. You can make them as long or as short as you like, just be consistent.
You will need 12 chain links (3 of each size).
Step 3-Make your mobile frame
Using jump rings, attach your jewelry chain to your craft rings. Start with the largest ring. The large ring will be the top of your mobile. I worked in legs down the mobile rather than around. This made it easier to handle without it getting tangled.
- Add your large jump rings or split rings to the three medium sized circles middle pieces,
- Attach a short jewelry chain link and larger split ring to the end. (you’ll add your woodland animals here later. If you’re not adding the animals, leave this ring off)
- Add the last ring using a jump ring and craft ring.
- Repeat the process until you have three chain links hanging from your top craft ring.
Step 4. Measure out the chain length to hang from the ceiling.
Determine how low you want your mobile to hang and measure out three equal jewelry chain lengths. Attach them to the large top ring and connect then with one last jump ring. NOW you should have your finished DIY mobile frame and it’s suitable to hang from the ceiling.
If you chose rings, chains and jumps that all match, you can skip the painting step. I, on the other hand, had a mashup of metal, so I needed to spray paint.
Optional Steps: Prep to paint your mobile
I learned this step the hard way. Once my mobile frame was assembled I needed to paint just the chains because as you can tell from the photos above, I had already painted my craft rings. Here are instructions on what you SHOULD do to paint the mobile:
- Drill a small hole in a piece of scrap wood.
- Screw in your ceiling hook
- Hang your mobile from the wood and hook (I used my ladder and my drill to balance the hanging mobile)
- Spray paint.
Give it a good coat of paint and allow to dry.
Honestly, the mobile is really cute as is, but this is a baby nursery and I wanted to take this DIY room décor idea just a tad bit further by adding some fun animals. We mixed woodland, safari and a few sea animals throughout the room.
Now, how to make it a BABY mobile by adding animals
I originally planned to use plastic 3-D animals–but girl them animals were $8 EACH at Michael’s. At the time, I planned to use six of them. $48 on some animals. Umm no. So I had to move to plan E. I happened upon these cuties in Walmart and they cost a whopping 57 cents each. Snatched them right up!
You’ll need six animals to have a face on all sides
The colors were ALMOST perfect for the orange, navy blue, and gray nursery, so I jazzed them up with a coat of orange spray paint. Depending on your colors you may leave them as is.
Next, using a spatula, separate the face from the three remaining animals. Once the spray paint is dry, give them a good dollop of good ole hot glue to reattach to the spray-painted side of the other animals. You won’t need the faceless pieces. Feel free to reuse as necessary.
Finally, drill a hole in the top of the animal and attached it to the large jump ring.
I know the instructions may sound complicated but really it wasn’t at all. Just a lot of attaching. This is incredibly easy.
How to hang the mobile above the crib
The mobile ends up weighing about two pounds with all the metal and the wood animals, but nothing a simple ceiling hook can’t handle. Drill a small hole in the ceiling, screw in the hook and hang your creation.
We are just in love with it and so glad I took the time to make the mobile instead of buying one. It doesn’t have music or move around, but there’s a lot of love in my effort.
Now I told you this wasn’t without drama. My sis lives across town and when I went to hang it and take photos, I forgot the animals! You talking about mad! Here’s one is snapped outside of my home.
This.Thing.Is.CUTE!! I want to make one (sans the animals) for my living room. You could play around with it and hang in it several different ways. Don’t be surprised if you see a similar take on this idea somewhere else in my home.
Week 5 Baby Nursery One Room Challenge Update
I’m making this mobile as a part of the One Room Challenge hosted by Linda of Calling it Home and Better Homes and Gardens. The challenge: makeover a space in six weeks.
This is the last week before reveal day. I’m ready to style and take photos. I have odds and ends to shop for, but that’s about it. I MAY give that light fixture another go but I may not.
Right now I’ll just relish in the fact that I have another super easy, yet incredible DIY craft under my belt.
Update: here’s a better photo of the mobile in the room:
Need to catch up? Check out the remaining weeks.
Week 1 | How to set up and decorate a baby nursery (In 6 weeks!)
Week 2 | How to make a simple wooden picture frame for large art prints
Week 3 | Oh So Cute DIY Changing Table Topper
Week 4 | When Bright Ideas Go Dark-ORC Nursery Update
Week 5 (You are here)
Week 6 | Simple DIY Room Décor for your Baby Nursery
Ola says
This was super easy and affordable Kenyatta. Really nice hack!
Rhonesha Bontemps says
I love this. It’s sophisticated and playful at the same time.