Updating your outdoor décor for fall is easy as pie when you add a simple autumn wreath to your front door. And simple does NOT negate drop-dead gorgeous. On the contrary, you can design a stylish simple fall wreath with just a few supplies without spending a ton of money.
Note: This tutorial was originally published as a part of a round-up of stylish fall wreaths in 2018. I decided to make the tutorial separate to cut down the visual confusion.

This post contains affiliate links for your convenience. If you click on a link and make a purchase I earn a small commission to help me run this site at no cost to you. Read my full disclosure here.
I am an occasional seasonal decorator and fall has somehow turned into my second favorite season to decorate. You can check out my 2019 Fall Home Tour here.
A few years back I made a non-seasonal beautiful wreath for my front door and it added a layer of charm that I loved. At that point it was neutral so I could leave it up year-round. My husband also had to be convinced of the need wreath outside of the Christmas Season. Sigh. I won him over by coming up with a simple front door wreath.
Related: 6 Ways to Decorate for Fall on a Budget
I guess he’s on board now because he doesn’t balk at. He also doesn’t acknowledge it either. So there’s that.
Anyway.
Now I’ll give you the rundown on how I DIY’d this simple fall wreath. And I even managed to get a little glam in there. My definition of glam is anything that sparkles-gold, silver, mirror, jewels, so humor me, please.) This can be used all season long including greeting your guests at Thanksgiving.

How to Make a Simple Fall Wreath-Step by Step
This post contains affiliate links for your convenience. If you click on a link and make a purchase I earn a small commission to help me run this site at no cost to you. Read my full disclosure here.
DIY Fall Wreath Supplies
- Wreath Form (I already had one on hand)
- Brown gross grain ribbon
- Hot Glue
- Hot Glue gun
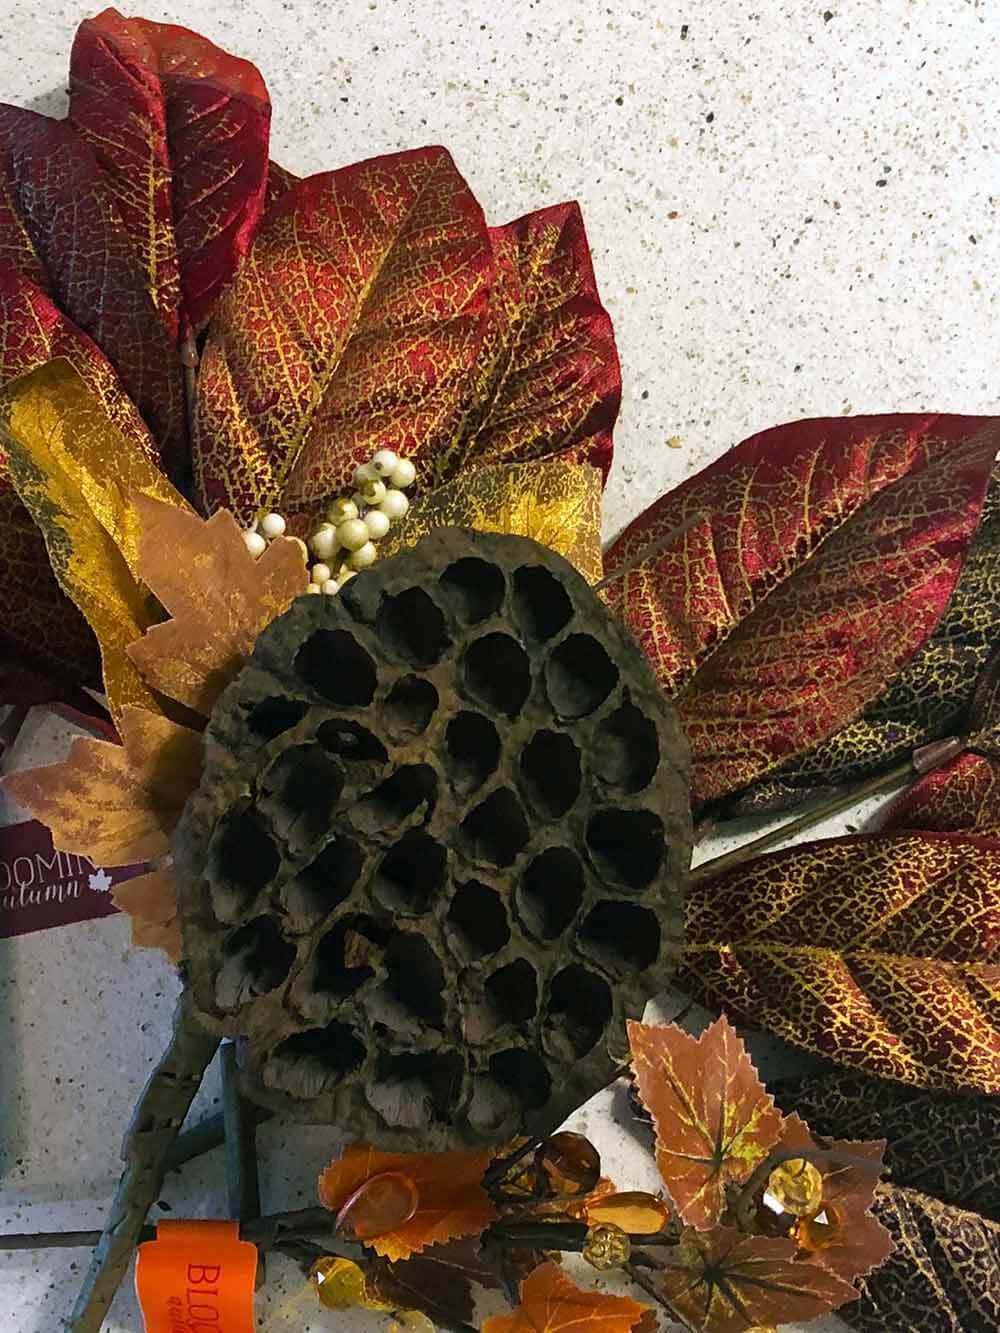
- 2 metallic magnolia leaf picks (I found mine instore at Joann’s) but these are pretty.
- 1 Lotus Pod and gold magnolia leaf pick. (I found at Michael’s, but these are great.
- Staple Gun and staples
- Gold craft paint (optional)
Step 1- Wrap your wreath form with ribbon.
Use a dollop of hot glue to start at the back of the wreath. Continue wrapping overlapping each row and pulling taught until you reach your starting point. Close it off with a second good dollop of hot glue.

I used my Spring/Summer wreath as the base of my fall wreath and let me tell you, I’m in love. It took me 15 minutes to get this thing together. Because I didn’t rewrap my wreath form, I’ll use photos from my original tutorial on the spring wreath.
Note: I started out with the thin wreath form, but ended up using the straw form. If I hadn’t already had that one on hand, I’d use the smooth Styrofoam one.
Step 2 -Determine your pick arrangement
Because I was re-using my old wreath, I made sure to cover the old glue marks. You can choose to put your flowers wherever. I kept mine on the lower left.
Place one floral pick on the top, glue down. You’ll need to glue down each leaf in enough places to ensure they don’t fall off. These particular picks are pretty heavy, so use your glue liberally. Flip the second pick around and glue as well.
Add your middle piece using the same glue technique.
Step 3 – Lighten your Lotus Pod (optional)
The Lotus pod looked a tad dark so I took some gold craft paint and highlighted the cone. And I fully admit to painting it while it was hanging on the door.
Step 4 – Here’s how to hang your wreath using ribbon
This wreath cannot be hung with a wreath hanger because it’s too think. I measure out a scrap of ribbon to hang. Get a second pair of eyeballs to help you determine where to hang the wreath. Once you determine placement, use a staple gun to staple it to the top of the door. You may be able to get away with a heavy-duty flat stapler, but I’ve never tried.
(I do this alone by opening the door, standing on a chair and centering it. Because the top of my door is glass, I’m able to judge from the front and the back.) The thin ribbon and staple do not interfere with the door opening or closing.
And that’s it. Easy as pie Simple fall DIY wreath.


Leave a Reply