So you’re on the quest for a lush green lawn? Join the club. Green grass is like a passage of rites in the neighborhood. And I found a shortcut to get it. Now I’ll tell you upfront, you will have to work for it, but it’s a fast track to grow grass from seed in Florida sandy soil.
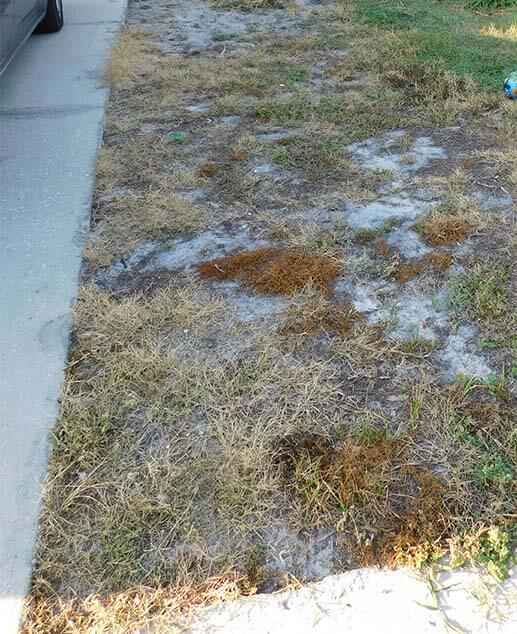
For years everyone on our block in our Central Florida neighborhood has complained that they couldn’t grow grass. We all had nice, green layers of weeds in the summer when the rain was bountiful. One of my neighbors put down sod three times in the last 10 years.
The struggle is real.
I almost coveted those tall blades of St. Augustine lushness I’ve seen growing in some higher-end neighborhoods. But I don’t have an irrigation system, so St. Augustine grass is not even thinkable. Plus, the maintenance of St. Augustine grass is a beast. You have to stay on top of pests, watering and fertilizing.
You want a beautiful grassy oasis, but don’t have the time nor finances for all that. I know, me too.
This post contains affiliate links. If you make a purchase after clicking on a product link, I make a small commission at no cost to you. for more information view my policy here.
So what’s a girl to do when you want the look of St. Augustine but a tight budget? Research, research, research. When you want something bad enough, sometimes you have to will it into existence and most times that involves figuring it out.
I looked into every grass variety you could think of and discovered Argentine Bahia (not to be confused with Pensacola Bahia) grass grows well in Florida, is drought resistant so it doesn’t need an irrigation system, doesn’t have a lot of pest problems AND it resembles St. Augustine.
What what!? Yep.
So, of course, a girl like me says sign me up.
Seeding vs Sodding your Florida lawn
There are two ways to get a new lawn. Grow it from seed or buy sod and lay it. To sod a lawn you need to kill and remove the old grass (er umm, weeds) lay down the grass and BAM. Instant lawn.
Seeding, on the other hand, requires a lot of patience. It typically takes several weeks to go from brown to green and then you have a really immature-looking lawn for few months or so. You have to worry about rain washing away your seed and birds eating your precious grain.
So why should you choose to seed your Florida sandy yard?
- Supply costs. I only had to spend about $150 for all my supplies. For the amount of sod, I would need the cost would be about $300 including delivery.
- Cow patties and insects. Umm when you get grass from a farm, it has such things in it that acted as a Kenyatta-acide. I was straight repelled by it. Once the sod is down, it’s recommended that you pay a professional service to debug your lawn. The cow patties are yours to deal with alone.
- Irrigation costs. Having to water the sod twice a day for a month cost my neighbor $400 on her water bill. I don’t know about you, but I can’t afford that.
Choosing the right seed for sandy Florida Soil
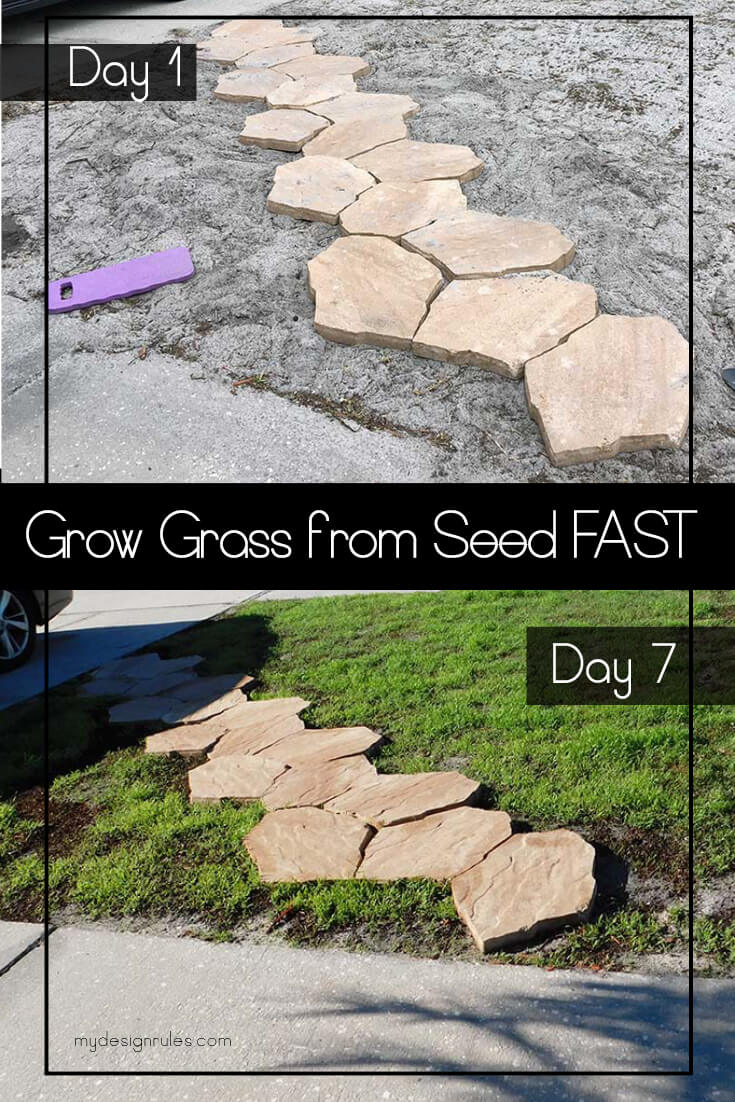
Doing all my research on the best type of grass, I stumbled on a grass seed product that contains a mix of Argentine Bahia and Browntop Millet. The browntop millet is key for taking your lawn from sand to grass quickly. It germinates in just a few days compared to most grass varieties (including Bahia) which germinate in a few weeks. The result: A lawn FULL of baby grass in just one week!
Mind blown. Don’t take my word for it. Look at the progression of photos.
The seed I purchased contained a mixture of 75% Argentine Bahia and 25% browntop millet. (Keep reading to see why it’s a little patchy.)
The browntop millet fills in rather quickly protecting the Bahia from drying out and holding down the soil long enough for it to germinate and produce the lusciousness you want in a green beautiful lawn.
How to successfully seed Florida grass
I want to preface this section by saying I am not afraid of hard work and actually found this process extremely therapeutic. There are much easier and much faster ways to do a few of these steps which I noted for your benefit, but I took the long route.
Supplies
Make sure you measure your lawn. All the products you buy will be applied based on the square footage or yardage.
- Grass seed mixture
- Spreader
- Herbicide such as Round-Up
- Topsoil
- Peat moss
- Heavy-duty garden gloves
- Contractor or lawn bags
- Rakes, hoes, shovels (see below) as needed
Irrigation Supplies
Plan your seeding time
The best time to seed your lawn is actually in the FALL (when nobody is thinking about grass right?). The Florida sun is brutal and seeding in the fall helps alleviate the heat from drying out your seed. To seed in the fall, you want to use is a mix of Argentine Bahia and Gulf Annual Ryegrass.
If you’re like me and the rest of society that thinks about grass too late, here’s how you do it in spring!
For the Argentine Bahia to germinate properly, seeds need temperatures to be consistently above 65 degrees –including night time. The seed won’t germinate and grow properly if the temperature drops below 65.
Also, note that you will need to wait about a week in between applications of Roundup and seeding so you don’t kill your seeds off the bat. I told you this would be a process right?
Kill off your old lawn and remove the debris to prep for seed
You’re here because your lawn is completely covered in weeds and random grass types right? Well, I had that plus a tree stump that needed to go. This was a relatively easy process. To kill all vegetation on the lawn, spray it with an herbicide. The lawn took a few days to die and then it’s time to take up the deadness left behind.
I really thought this would be as easy as raking up dead stuff. Not so. The dead grass and weeds had deep roots that had to be pretty much be dug out. The easy method is to rent a sod cutter from Home Depot or the like for about $100 a day. But I had zero experience in using such things and by the time you add delivery and pick up… well I just said no thanks. A power tiller would probably do a great job too.
I chose to use a hoe, a shovel and do it manually. It took me a few nights (no way I was doing this in the Florida sun!). I popped in my headphones and listened to a good book. (You’ll also want to buy Epsom salt for a good tub soak afterward.) Use the lawn bags to handle all the debris.

To remove the tree stump, I drilled holes into the stump and poured several gallons of boiling water over it. That left it soft enough for my husband to break up with a sledgehammer. The root system was vast but very shallow. I pulled up the roots as I dug up the dead grass. Laborious indeed.
Get your soil ready
After removing the lawn you’ll pretty much be left with a beach in your yard. Big ‘ole sandbox if you will. Purchase a few bags of this augmented topsoil to fertilize the seed a bit and give the sandy soil some nutrients and density and cheap topsoil to fill any holes. I recommend spraying it with another application of herbicide to kill off any new weed seeds that germinated while you disturbed the old grass and that might be hiding in the topsoil you bought. The last thing you want to do is plant your new seed among tons of weeds that all grow at the same time.
At this point, you want to level out the soil. The best and easiest way to do this is to rent a lawn roller, fill it with water and roll the dirt level.
You know I didn’t do that right? And it wasn’t because I was being cheap. None of the hardware stores in my area had one. I just did the best I could with my lawn tools.
Set up your irrigation
We don’t have an irrigation system, so I had to piece one together using a little ingenuity. We have water spigots on both sides of our home. I bought these very inexpensive but very effective lawn sprinkler heads, and a water hose. I placed them on the lawn and made sure the water hit everywhere. Simple, cheap and effective.
Spread the seed and add a layer of peat moss
Next, use a spreader to lay the seed. You can use a rake to lightly blend the seed and the topsoil, but make sure you don’t bury it too deep. It needs sunshine. Then add a layer of peat moss on top of the seed.
This little tip is golden for four reasons:
- It adds richness to the soil to help prevent erosion of the sand and seed,
- Peat moss is packed with grass nutrients,
- It kept the birds from eating my seed; and
- It served as a fantastic gauge of when I needed to water the lawn. The peat moss will turn light brown when dry versus almost black when moist.
The easy way to apply peat moss is to rent a peat moss spreader. But all my stores were out. I used a rake and gloved hands to sprinkle a thin layer on top.
Water, water, water!
I timed my planting at the start of the Florida rainy season. Almost too close really. I was racing the rain clouds to put on my last bit of peat moss. As soon as I was done the sky opened up and it rained for THREE STRAIGHT DAYS!
The torrential rain freaked me out. I just knew all my hard work (and money would be washed away). Thank goodness for the peat moss because it saved SOME of the seed! There were rivers of sand where runoff had taken away my top layer of peat moss and seed.
Despite the loss, I still had baby grass in just three days.
I just filled the bare spots in with more seed and peat moss and hoped for the best.
Now if you’re not lucky enough to plan a rainstorm, you need to stay on top of watering the grass. NEVER let your seed dry out. The seed will require a light soaking in the morning and in the evenings. You don’t want to drown the seed, but it needs to remain moist. There were a few days of Florida heat that even required me to water in the middle of the day, which is typically a no-no, but my peat moss let me know it needed it and gave me peace of mind that the seed wouldn’t be scorched
I turned the sprinklers on for about 15 minutes at each watering.
Caring for your new green lawn
Typically you wait to mow early grass, but the browntop millet grows extremely fast. Keep it mowed or it will overtake the Argentine Bahia. We mowed after 14 days but would have mowed sooner, but our lawnmower broke at an inopportune time and we had to borrow a neighbor’s.
Make sure to continually water your lawn through the summer and the Bahia came in nice and thick. With some weeds. Whomp whomp, BUT nothing a little weed and feed didn’t take care of.
I didn’t stay on top of it during the fall and winter and so it needs some babying at the moment, but the grass is in decent shape. I should have fertilized every four months and I would be in a better place. I bookmarked it on my calendar to combat that this go ‘round. A neighbor of mine put down sod the same time I was laboring over my yard, and mine actually looks better than hers at this juncture. I can tell neither of us fertilized over the winter but her lawn is mostly weeds now.
Also, note that Bahia goes dormant in the winter months. If you want year-round lushness you can overseed the grass with Ryegrass that will flourish in the winter and goes dormant in the summer. I plan to give that a shot this year. we’ll see how it goes.
You can SO do this. I promise all the effort is worth it. You just have to roll your sleeves up and make up your mind to do it.
Raivondreia Fitts says
I’m hoping to use the ryegrass on our yard in Wichita since it gets so cold here, for now the grass is flourishing but in the winter months it looks so dry and dead. so fall time ill send you an update on what I actually accomplished. I’ve never seen myself as a Gardner or caring how my yard looks but I have (I think its my age) lol reading your blogs makes me feel like I can do anything! I’m trying something different every month so thank you for always sharing!
Kenyatta Harris says
You CAN do anything. Just set your mind to it and get all the info up front. Please share how it turns out!
Gail says
You go, Kenyatta!!! Your lawn looks beautiful! That’s a lot of hard work but worth the results!
Kenyatta Harris says
Thank you Gail. The payoff was BIG on this project.