If you’re in the market to painting your laminate kitchen cabinets you need all the RIGHT paint supplies to get a great finish. Trust me, the right tools for the right job makes all the difference.
I wrote about making over my vanilla laminate kitchen and shared the details on the best paint for laminate cabinets several months ago and as that continues to be the most popular content on my site and so many requests, I decided to write a dedicated post for supplies needed to paint your kitchen. I included the list below along with a free downloadable checklist to save you a trip or two to the hardware store.
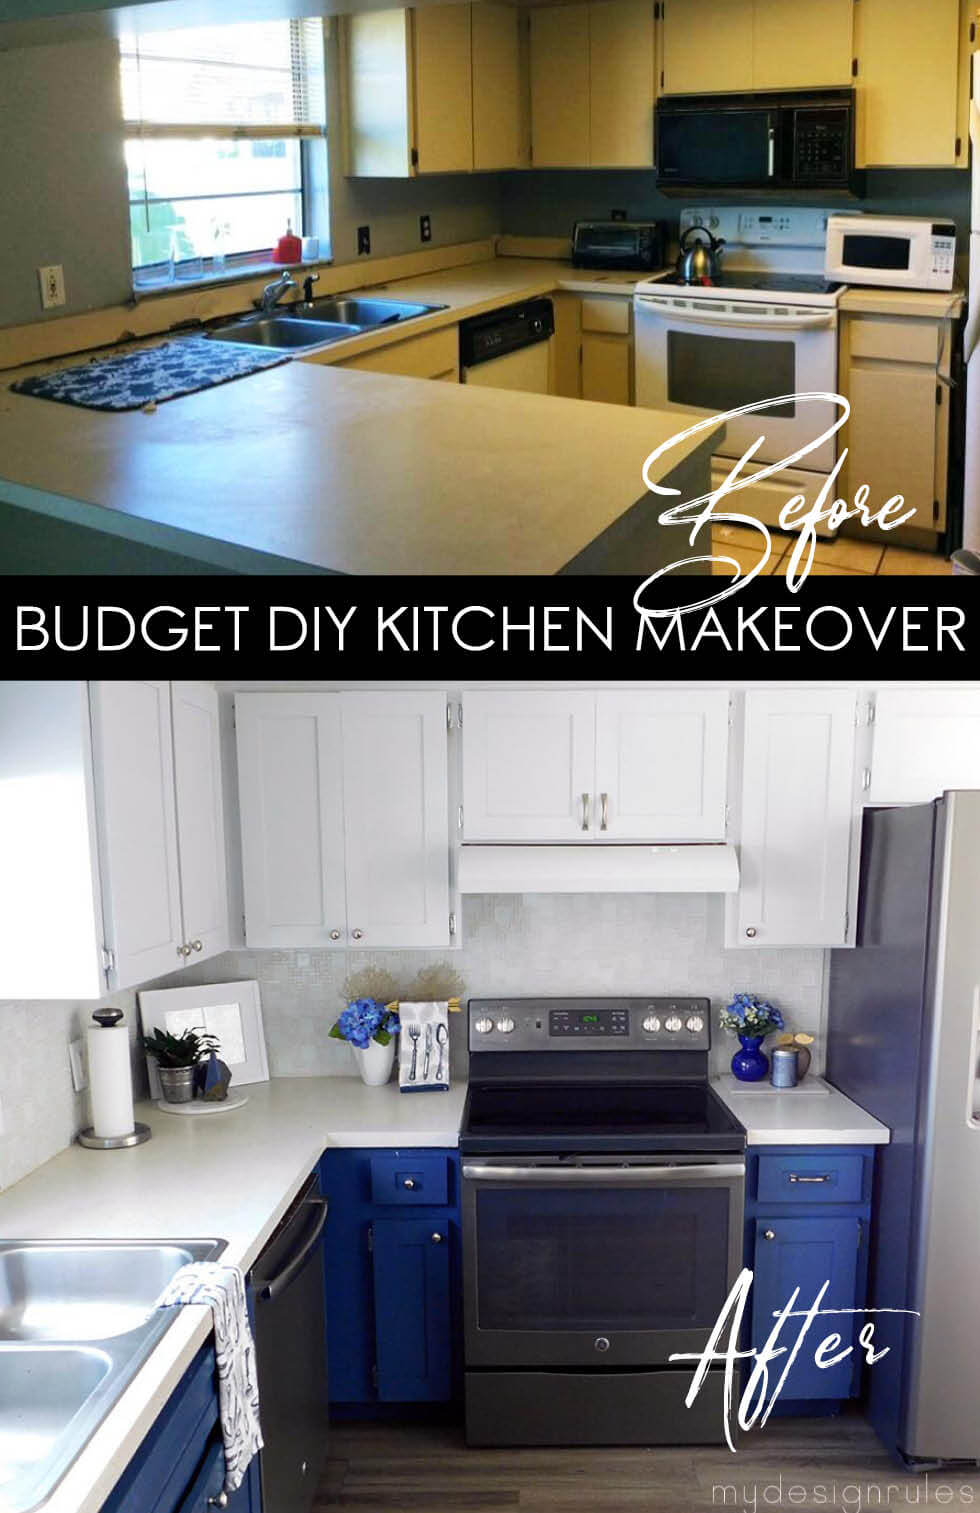
I will also regretfully say no, I’m not done with the kitchen because I’m STILL stewing over what to do about lighting. Everything else is complete.
This post contains affiliate links for your convenience. If you click on a link and make a purchase I earn a small commission to help me run this site at no cost to you. Read my full disclosure here.
Laminate Cabinet Paint Supply Checklist
Prep Work Painting Supplies
- Cleaning Rags
- Sanding block or sandpaper
- Tacks Cloth to clean sanding dust
- TSP or another degreaser
- Screwdriver
- Paint Can Opener. ( 79 cents well spent.)
- Utility Knife
Painting Materials
- Quality Primer. I recommend Sherwin Williams Extreme Bond. One quart and one coat should cover an average-sized kitchen.
- Caulk and Caulk gun. Seal any gaps between ceilings with these two garage staples. Make sure you purchase paintable caulk. For best results, prime your cabinets, then caulk any gaps or seams.
- Good Quality Paint. I recommend Sherwin Williams Proclassic in Semi-Gloss. If you have the patience to wait for Benjamin Moore Advance go with that. The Proclassic is holding up well in my kitchen after two years. I purchased one quart for my lower cabinets and one quart for my upper cabinets and had plenty to spare. If you’re painting all one color; a gallon will be more than sufficient. Read this post on why I think this is the best paint for laminate kitchen cabinets.
- Quality Soft Bristle Brushes. Don’t skimp on brushes. These are my name brand go-tos. I have found an off brand at my local paint store that costs much less and produces the same outcome. Just be careful.
- Paint Tray. You don’t need a fancy tray. A simple large one and a small one will suffice.
- Cabinet Foam Roller. Make sure you buy high-density foam rollers marked “cabinet rollers.” These will leave the smoothest finish.
- Painters Tape. Dollar Tree tape won’t cut it…(ask me how I know) Get the good stuff. I like Blue Tape Brand.
- Mini (mouthwash) cups or 2×4’s. You’re going to need something to keep your cabinet doors off the floor. You could waste your money on the painters’ triangles or you could buy a $1 pack of mouthwash cups or use scrap wood. Just make sure you have enough to hold all your cabinet doors.
Supplies you’ll need to protect your body from paint
- Disposable gloves. I make a mess when I DIY because I always forget to protect myself. Do yourself a favor: buy a bunch of disposable gloves AND remember to put them on.
- Shower Cap. Cleaning paint out of your hair is no fun. Put on a shower cap!
- Old Clothes. I can’t tell you how many jean skirts I have ruined because I just jumped into a project without changing. Change into painting clothes.

Material for protecting your belongings
- Drop Cloth(s). Get a good cloth or tap to protect your floors. The $1 ones are just ok. If you can afford better do so.
- Aluminum Foil or Plastic Grocery Bags. I hate cleaning paint trays. I use grocery store bags to line my trays. Simply wrap the tray, pour your paint and discard afterward. This saves a ton of time and water.
Supplies for Putting your kitchen back together
- Hardware: Make sure you have enough working hardware to put your kitchen back together. Examine your hinges and handles.
- Hardware Templates. I used a template to gauge where to drill holes for my new hardware. If you’re adding trim, make sure you buy nuts and bolts to accommodate the extra depth of the cabinets.
- Bumpers. My new hinges came with bumpers for each cabinet door, but you can buy them separately if you don’t need new hinges. These items will make your life easier but aren’t necessarily
- Paint Sprayer. No explanation need. Paint faster and get a factory finish
- Paint Strainer If using a paint sprayer, this helps prevent your paint from clogging the sprayer.
- Spray Shelter. Keeps paint from getting everywhere.
- Plastic Paint Lids. I don’t buy paint without a plastic paint lid anymore. They make pouring and storing paint so much easier. I’ve had entire cans of paint dry out on me. Such a waste of money. Clean your paint can of any excess wet paint and snap on. I’ve been lucky enough to find them in my Dollar Tree. If you can’t find or afford any, I recommend cleaning the can top, closing it as usual AND tying a plastic bag on top.
- Power Drill.I hope you have one of these anyway, but it will make removing and installing the cabinet doors so much easier.
Download the list here or shop for the links above.

The painting process went fairly smooth for me, but I sure wish I would have had a paint supply checklist when I was working on it. I was true newbie when tackled my kitchen cabinets. If you are too…you can so do this!

Jan says
Hi, Thank you for such an informative tutorial. I was wondering how your cabinets are holding up a year later? I’m getting ready to do my laminate cabinets, just worry about durability long term. Thank you
Kenyatta Harris says
Hi Jan, I actually painted my cabinets in the fall of 2016, so it’s been about 2.5 years. The top cabinets are holding up beautifully. There is a little wear around the knobs of the cabinets we use the most, but the knicks are very small and would need just a minor touch up. I talked briefly about the paint fail for the lower cabinets on my post about the best paint for laminate kitchen cabinets here. They’re in pretty bad shape and need to be repainted. I highly recommend the Proclassic if you’re doing a lighter color.
Painting Contractor says
Truly amazing what paint color can do. Love all of your ideas for the future!
Albat says
Thanks for share……
N-Hance Silicon Valley says
Hi Kenyatta, I love all your Ideas on painting kitchen cabinets. I also like your images and videos as well which you have shared above in the post. Wonderful write ups, Thank you for your share! Keep sharing such informative Posts with us.