
Photography Credit: @CreatedFour
When I planned my wedding in 2003 the number one must-have item I desired was amazing invitations to match my red and gold oriental theme. I didn’t have time to create my own; so I found some prom invites from Shindigz.com and improvised with black envelopes and gold RSVP cards. The concept was great, but the results were less than stellar and I was majorly disappointed. Not getting a printed proof of the invite proved disastrous. The jewel-toned card was gorgeous, but the font I chose was way too small.
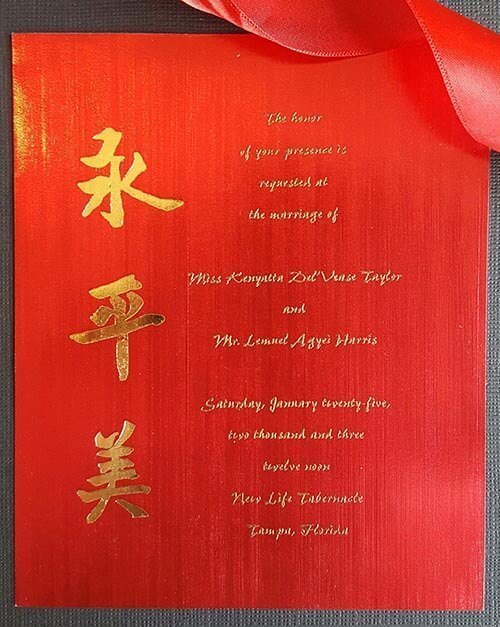
Beautiful Design. Poor font size choice ruined my wedding invitations. It was a prom invitation that I used a wedding invite but didn’t have time to get a print proof.
Since that disaster, I’ve come a long way in designing stationery for weddings. Using a few basic tips, I’ve produced some stunning results for friends and family. I had the pleasure of working with Angelina Adams at the theApostolicWife.com to create a beautiful wedding suite a few weeks ago. She’s a wedding consultant with talent for days. If you’re looking for a wedding coordinator or stylist—book her now! After the shoot, I decided to share a little insight on how to do it yourself.
This post is the first in a series on creating your own wedding stationery.

1. Set a Budget
Surprise! I know you didn’t think that was going to be number one, but often budget is the driving force for ANY project.
It’s easy to go overboard with little details, that can mean so much in the moment, but are really just out of reach in the grand scheme of your event. There’s a balance of how many squeals of delight you can afford versus how many you really want.
The budget will help you make choices when it comes to paper, printing, embellishments and mailing costs.
2. Plan to Produce Said Invitations
While it may not seem like a design choice, determining how you’re going to produce your invitation will make a major impact on your finished product. Will you print at home, at a local print and copy, or get it professionally printed online? Each will net you different results AND determine your creative limitations.
At Home Printing:
If you’re printing at home on an ink-jet printer you may want to consider using light touches of color, versus fully saturated invitations. Your wallet and your printer will thank you. You’ll be able to print more invitations using less ink and avoid burning out your printer. To save money on ink, I generally buy several cartridges of off-brand refills from Ink Technologies.com. I get very good quality printing with my HP Officejet.

These Gold and White invitations were a DIY project I created using inkjet printing. Use high-quality paper to yield polished results.
I generally like the look of inkjet-printed invites on bright white 110-lb paper. It feels rich and high-end versus the commercial look that laser printing can sometimes produce. Adversely, if you’re printing 500 invitation sets, you don’t want to spend days feeding paper and waiting for all your invites to print.
Local Print and Copy Center:
If you have a little more budget or are using heavy inks, this is a great option for small quantities. And for all my procrastinators, printing at a copy center is a lifesaver. Invites printed on quality cardstock paper will generally run you about 65 cents per sheet, and you can usually put two invitations on one sheet.
Professional Printing:
I have to admit: I’ve never professionally printed my invitations. But boy have I wanted to. I would resort to professional printing when you have the budget. Generally, those who I’ve done work for haven’t had the budget to do so. Well, one did, but I blew the budget on embellishments and paper instead. So yeah, I made a choice, but it was worth it.
Professional printing opens up a world of paper possibilities as well as finishing techniques such as scoring, perforations and tear offs. These would be way too time-consuming to produce multiples by hand.
3. Get an Assembly Plan
On a few occasions, I’ve had to consider how time-consuming it would be to tie a bajillion ribbons, add 30 rhinestones and glue 400 liners in envelopes. If you love your friends and family, consider saving yourself the eye rolls and fits of rage when you’re trying to put your creation together. You also need to take note of who’s on your assembly team. Consider your least crafty person who’s able to make your dreams a reality. If you’re a perfectionist, you may want to make your invites as simple as possible.
On my next post, we will take a look at what to do when it’s time to face the computer and create your design.
Have you ever designed stationery?
Andrea Harris says
This has a warm, inviting conversational feel, I really enjoyed “visiting ” with you here.
R. Coonce says
Your tips are very helpful and eye opening. Thanks For sharing!
Kenyatta Harris says
You’re so welcome. Thanks for stopping by!
Dina says
Great tips…I look forward to applying them for my next event.
Kenyatta Harris says
You’re welcome!